Introduction
In this project, we are creating a smart rain detection system using the ESP8266 microcontroller, a rain sensor, and a servo motor. The ESP8266 monitors the weather conditions in real time, and as soon as rain is detected, it sends an automated email alert to your inbox. Additionally, the system uses a servo motor to perform actions like covering sensitive items during rainfall, making it ideal for home automation, smart gardening, or protecting outdoor electronics.
Components Required
To build this project, you will need the following components:
- ESP8266 Microcontroller: The brain of our system, responsible for WiFi connectivity and controlling the sensor and servo.
- Rain Sensor: Detects the presence of water and outputs a digital signal when rain is detected.
- Servo Motor: Moves based on the sensor’s reading, ideal for physically covering objects in the rain.
- WiFi Connectivity: Required for sending email alerts.
- SMTP Mail Server: In our case, we are using Gmail’s SMTP server to send notifications.
Project Overview
The core functionality of the system revolves around the rain sensor. It’s connected to the ESP8266, which continuously monitors the sensor’s output. When water is detected, the ESP8266 triggers the servo motor and sends an email notification via Gmail’s SMTP server using the ESP_Mail_Client library.
This kind of system can be particularly useful in a variety of scenarios:
- Smart Home Automation: Automatically activate motorized window coverings or cover outdoor electronics.
- Gardening: Get notified when it rains, so you can adjust irrigation schedules accordingly.
- Weather Monitoring: Simple, low-cost weather monitoring solution.
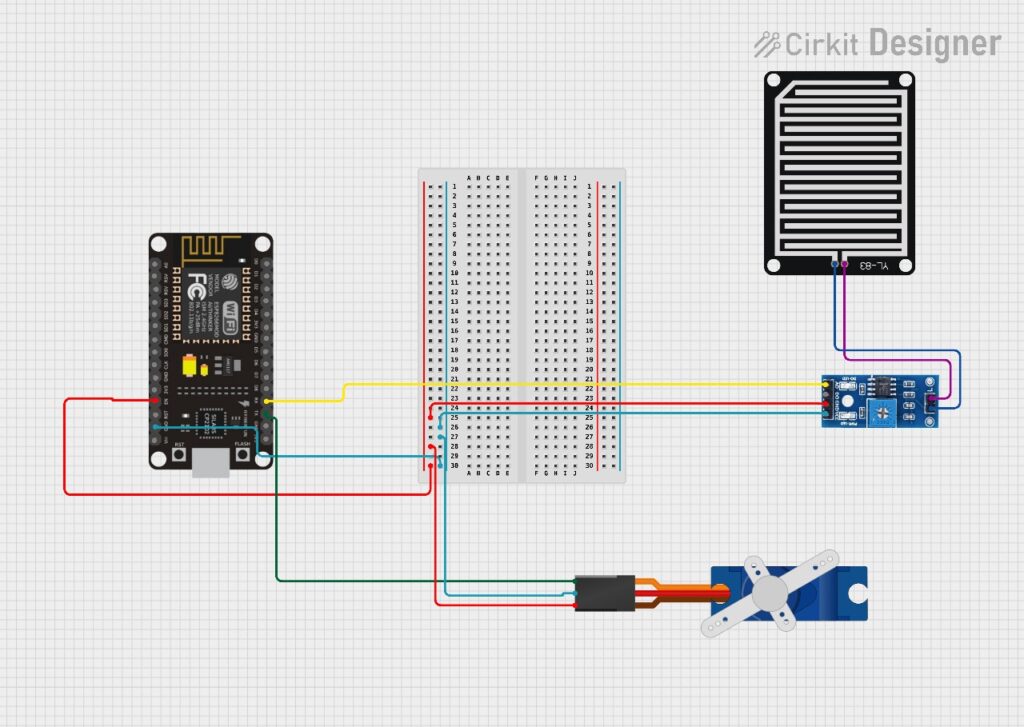
Circuit Diagram
For this project, the wiring is relatively simple:
- The rain sensor is connected to GPIO pin 4 of the ESP8266.
- The servo motor is connected to GPIO pin 14.
- The ESP8266 connects to your WiFi network to send the email.
The Code Breakdown
In our code, we first initialize the necessary components:
- WiFi is set up using the
ESP8266WiFi.hlibrary to connect the ESP8266 to your local network. - The ESP_Mail_Client library handles the email sending process via Gmail’s SMTP server.
- The Servo library controls the servo motor that performs actions based on the sensor’s readings.
Here’s the key part of the code that sends an email notification when rain is detected:
if (rainStatus == LOW) {
  Serial.println("Water Detected!");
  s1.write(180);  // Move servo to cover
  if (!emailSent) {
    sendEmail();
    emailSent = true;
  }
}
The sendEmail function uses the ESP_Mail_Client library to configure the SMTP session and send the message. Once an email is sent successfully, the system ensures that it doesn’t resend emails until the next detection cycle.
Sending Email Notifications
To send an email, you’ll need to configure an App Password in your Gmail account, which adds an extra layer of security. This password is then used in the code to authenticate the SMTP session. The following settings are required for the SMTP server:
session.server.host_name = "smtp.gmail.com";
session.server.port = 587;
session.login.email = smtp_user;
session.login.password = smtp_pass;
After configuring this, the ESP8266 will be able to send you an email whenever rain is detected.
Here Is The Full Code Of Your Project
#include <ESP8266WiFi.h>
#include <ESP_Mail_Client.h>  // Correct library for sending emails via SMTP
#include <Servo.h>

#define RAIN_SENSOR_PIN 4  // GPIO pin connected to DO of rain sensor
Servo s1;

// WiFi credentials
const char* ssid = "vivo Y72 5G";           // Replace with your WiFi SSID
const char* password = "@Siddharth123456";  // Replace with your WiFi password

// SMTP server settings
const char* smtp_server = "smtp.gmail.com";  // Replace with your SMTP server
const int smtp_port = 587;                     // SMTP port (usually 465 for SSL)
const char* smtp_user = "// Your email";
const char* smtp_pass = "// Replace with your App Password";
const char* recipient_email = " // Recipient's email";

// SMTP session
SMTPSession smtp;  // Correct object for the session
bool emailSent = false;

void setup() {
  s1.attach(14);
  Serial.begin(115200);
  pinMode(RAIN_SENSOR_PIN, INPUT);

  // Connect to WiFi
  WiFi.begin(ssid, password);
  while (WiFi.status() != WL_CONNECTED) {
    delay(1000);
    Serial.println("Connecting to WiFi...");
  }
  Serial.println("Connected to WiFi");
}

void loop() {
  int rainStatus = digitalRead(RAIN_SENSOR_PIN);  // Read the digital output from the sensor

  if (rainStatus == LOW) {  // Sensor outputs LOW when water is detected
    Serial.println("Water Detected!");
    s1.write(180);

    // Send an email when water is detected
       if (!emailSent) {
      sendEmail();
      emailSent = true;
    }

  } else {
    Serial.println("No Water Detected.");
    s1.write(0);
    emailSent = false;
  }

  delay(1000);  // Delay for a second for the next reading
}

void sendEmail() {
  // Set up the SMTP server settings
  ESP_Mail_Session session;
  session.server.host_name = smtp_server;
  session.server.port = smtp_port;
  session.login.email = smtp_user;
  session.login.password = smtp_pass;
  //session.server.ssl = true;  // Use SSL for port 465

  // Prepare the message
  SMTP_Message message;
  message.sender.name = "ESP8266 Rain Sensor";
  message.sender.email = smtp_user;
  message.subject = "Water Detected by Rain Sensor";
  message.addRecipient("Recipient", recipient_email);
  message.text.content = "Rain sensor has detected water.";

  // Connect and send the email
  if (!smtp.connect(&session)) {
    Serial.println("Could not connect to the mail server");
    return;
  }

  if (!MailClient.sendMail(&smtp, &message)) {
    Serial.println("Error sending email, reason: " + smtp.errorReason());
  } else {
    Serial.println("Email sent successfully");
  }

  // Terminate the SMTP session
  smtp.closeSession();
}
Circuit diagram
github repository link
https://github.com/SiddByte/Rain-Notification-Using-Email-IOT
Conclusion
This project is an excellent introduction to IoT, allowing you to create a simple yet effective smart weather monitoring system. By combining basic components like a rain sensor and servo with the power of ESP8266’s WiFi capabilities, you can build an automated system that helps protect your belongings or provides notifications to optimize irrigation schedules.
Future Improvements:
- You could enhance this project by integrating more sensors, such as temperature and humidity sensors, to get a complete picture of the weather.
- Connect the system to a mobile app for real-time updates and control over the servo mechanism.
- Use solar power to make it energy efficient and suitable for remote outdoor installations.
With just a few components and some code, you can build an effective IoT solution to monitor the weather and take automated actions—whether it’s for home automation, farming, or general weather monitoring.

Hey everyone, I’m Siddharth Sharma, a new software developer. I love making tech stuff easy to understand and solving coding puzzles in fun and creative ways. Let’s learn and grow together!